School Chemistry Lab Layout: From Planning Brief to Installation and Handover

A school chemistry lab layout should show how students will work, how the teacher will supervise them and how furniture connects to the building’s services. An attractive room image is useful, but a purchasing decision needs a measured drawing, agreed specifications and a clear installation scope.
For school owners, principals and procurement teams, the practical question is: what must be decided before ordering chemistry laboratory furniture?
Start with the curriculum and room survey. Compare bench arrangements, coordinate storage and utilities, approve an itemised quotation, and verify the completed installation before opening the laboratory. This guide explains that process for schools in India, including the CBSE checks that belong in the planning brief.
1. Define the teaching brief before choosing furniture
Begin with the chemistry teacher and laboratory staff. The experiments they intend to conduct determine the working surfaces, apparatus, storage and services the room needs.
Record the classes using the laboratory, practical activities, planned working groups, accessibility requirements and preparation routine. Distinguish the number of students enrolled from the number working in the laboratory at one time. A supplier’s package size does not establish a room’s safe capacity.
Ask how each lesson will run. Where will students collect apparatus? Can the teacher observe their work? Where will used glassware go? What happens when one group needs the sink while another needs teacher assistance?
These questions turn school chemistry lab design into an operational brief. They also prevent furniture quantities from becoming the starting assumption.
2. Check the CBSE requirements against the actual room
For a school chemistry lab layout in India, consult the current CBSE documents alongside applicable building, fire, accessibility and local requirements.
CBSE’s infrastructure page, Clause 4.2, specifies science laboratory provision with minimum dimensions of 9 m × 6 m each, described there as approximately 600 sq ft. It distinguishes composite science provision for Secondary from separate subject laboratories for Senior Secondary. CBSE also publishes a Chemistry Laboratory SOP with a model layout.
Treat these documents as inputs to a project review. A model arrangement cannot confirm the suitability of a different room, and a furniture purchase does not establish affiliation compliance. Ask the school’s architect or responsible project team to reconcile the applicable documents and any later amendments before approving dimensions or capacity.
Keep the source documents and review date with the approved layout. This makes future procurement and inspection discussions easier to trace.
3. Use a school chemistry lab layout template for the site survey
A useful school chemistry lab layout template starts with measured information. Copy the worksheet below into your planning brief and complete it before requesting a drawing.
| Survey field | Information to record |
|---|---|
| Teaching use | Classes, activities, working groups and supervision arrangements |
| Room measurements | Clear length, width, height, columns, beams and wall projections |
| Access | Door positions, opening directions and furniture delivery route |
| Existing services | Water, drainage, electrical supply and any existing gas or extraction provision |
| Furniture to retain | Dimensions, condition and suitability of each item |
| Storage | Apparatus inventory, chemical inventory and authorised access needs |
| Inclusive access | Student needs, approach routes, working positions and reachable controls |
| Programme | School working hours, available installation period and target opening date |
Photograph each wall and label the photographs to match the survey. Mark existing connections rather than assuming that they can move cheaply.
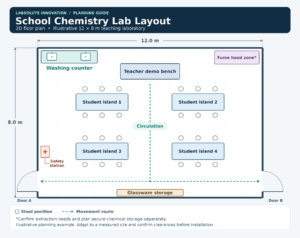
The resulting laboratory layout drawing should include a scale, dimensions, furniture references, service locations, movement routes, a legend and a revision number. A 3D view can help the school visualise the room, while the dimensioned plan supports coordination and ordering.
4. Compare wall benches, islands and peninsulas
The most useful school chemistry lab layout ideas explain when an arrangement works and what must be checked. Ask the designer to compare feasible options using the same teaching brief.
| Arrangement | Potential benefit | Main planning check |
|---|---|---|
| Wall-side benches | Can keep central floor space open and suit some existing service positions | Teacher sightlines and movement behind occupied workstations |
| Island benches | Can support group work with access from several sides | Clearances around every side and the route for services |
| Peninsula benches | Can connect work areas to a wall-based service route | Access around the free end and congestion at the wall connection |
| Mixed arrangement | Can separate wet practical work from selected dry activities | Clear purpose for each zone and an understandable circulation route |
Test the plan with stools occupied, cabinet doors open and apparatus on the worktop. Reagent racks and tall equipment can obstruct visibility even when the floor plan looks clear.
Set circulation dimensions through the competent design team’s review of applicable requirements. Adding another bench is useful only when the room can still support the intended activities and supervision.
5. Give each part of the laboratory a defined role
Teacher demonstration and student work areas
Locate the demonstration position so students can observe teaching without crowding around active experiments. Check the view from actual working positions, including seated positions.
Plan student workspaces around the apparatus used together during a lesson. A bench that holds glassware in a catalogue image may feel very different when students add stands, notebooks and other equipment.
Washing and apparatus storage
Place washing provision where the expected workflow can be managed. Show space for collecting used apparatus and handling cleaned items, rather than treating the laboratory sink as an isolated symbol.
Size storage from an inventory. Tall stands, fragile glassware and frequently used teaching materials need different arrangements. Identify where bags and unused stools will go so they do not occupy circulation routes. ACS laboratory layout guidance also emphasises supervision, accessibility and unobstructed walkways.
Chemical storage and activities requiring extraction
Define chemical storage with the responsible laboratory staff using the inventory, Safety Data Sheets and compatibility requirements. Specify suitable cabinets and authorised access; an ordinary cupboard should not be assumed suitable for every chemical.
Have a competent specialist assess activities requiring fume extraction and coordinate the equipment with the building. An exhaust fan’s presence alone does not demonstrate suitable control of a particular activity. Show the space, service routes and maintenance access required by the selected system.
6. Specify chemistry laboratory furniture by its intended use
Request specifications that identify each bench’s dimensions, frame, worktop, storage, fittings and installation method. A photograph and a material name leave too much room for interpretation.
For worktops, ask for product-specific evidence relevant to the chemicals, concentrations, contact times and cleaning methods expected in the laboratory. Granite, epoxy and phenolic products need assessment against the application; none should be described simply as universally chemical-proof.
Inspect samples and details around joints, edges and sink cut-outs. Confirm suitable seating, legroom and accessible working positions. Where heavy instruments are planned, request the relevant support and load information.
Modular furniture can support planned changes, but connected wet benches require service coordination before relocation. Treat movable dry tables and fixed service-connected workstations as different design decisions.
Explore Labsolute Innovation’s laboratory furniture options when preparing the shortlist, then request specifications matched to the approved room brief.
7. Agree who supplies, connects and tests each service
Many scope gaps occur between the furniture order and the building works. A bench with a sink may include the sink assembly while excluding water supply, drainage connections or final testing.
Use this responsibility checklist before approving the quotation. Enter the named contractor or supplier and their exact scope for every applicable row.
| Interface | Scope to confirm |
|---|---|
| Water and drainage | Sink, water fitting, pipework, final connection and testing |
| Electrical services | Furniture-mounted accessories, building circuits, protection and verification |
| Gas, if required | Dedicated fittings, distribution, isolation and specialist testing |
| Fume extraction | Equipment, duct route, discharge, associated building work and commissioning |
| Furniture installation | Delivery, assembly, anchoring, worktop joints and protection |
Identify water, gas and air fittings separately wherever required. A product description such as “three-way tap” is insufficient to define different services.
Record installation dependencies and the person who accepts each completed system. This gives the school a practical way to track readiness before students enter the room.
8. An illustrative renovation from brief to layout approval
The following is a hypothetical planning example, rather than a completed Labsolute project.
Consider a school replacing old chemistry benches while hoping to retain an existing washing area. The initial request is for more student places and additional cupboards.
The survey records the room, door openings and existing services. During the teacher review, the team identifies a potential conflict: students collecting apparatus could cross the route used by groups returning glassware.
The designer compares a wall-bench option with a mixed arrangement. Each drawing shows furniture dimensions and occupied working positions. The team reviews whether the retained washing location remains suitable and where storage can be accessed without obstructing practical work.
Before ordering, the school agrees the selected arrangement, working-group plan, cabinet functions and service responsibilities. The approved plan and furniture schedule carry matching item references.
During installation, any proposed substitution or service relocation returns to the project team for review. At handover, the school checks the delivered work against the approved documents and records outstanding items.
For a real installation case study, retain the initial survey, approved revisions, installation photographs and acceptance records. These provide evidence for explaining design decisions and reporting outcomes accurately.
9. Turn the approved layout into a comparable quotation
Use a bill of quantities, or BOQ, with the same item references as the drawing. Each line should state the furniture description, dimensions, quantity, material specification, included fittings and installation scope.
Separate furniture from equipment, consumables and building services. Then identify transport, unloading, taxes, site works, testing, warranties and exclusions. This prevents a “complete chemistry lab setup” label from concealing differences between offers.
Build the chemistry laboratory equipment list from the curriculum and working groups. Identify which apparatus is shared, which needs dedicated space and which requires a specific service. A long equipment list alone cannot confirm that the proposed school laboratory layout will work.
Ask suppliers to price the same approved scope. Keep optional upgrades separate so the school can compare essentials and enhancements clearly.
10. Sequence the installation around site readiness
Agree the installation programme with the school and relevant contractors. Confirm the room is ready for delivery, the access route is usable and necessary building work has reached the agreed stage.
Set out the furniture positions against the approved drawing before permanent fixing. Review service interfaces and resolve discrepancies while access is available.
Install furniture and worktops according to the agreed specifications and manufacturer’s instructions. Complete service connections through the responsible qualified trades, followed by the relevant verification and commissioning.
Protect finished surfaces during remaining work. Record changes on the drawings and resolve outstanding defects before accepting the room for its intended teaching use. An installation date should allow time for these checks and staff familiarisation.
11. Use a handover checklist before the first practical lesson
Ask for a handover pack that lets the school operate, maintain and review the laboratory after the installers leave.
- Approved and as-built drawings showing any changes.
- Delivered furniture and equipment schedules matched to the order.
- Relevant service test and commissioning records.
- Product care instructions, warranties and maintenance contacts.
- Staff familiarisation records and operating information for installed systems.
- An outstanding-items list with named owners and agreed completion dates.
Check drawers, doors, fittings, worktop condition and access routes against the agreed scope. Keep visual furniture checks distinct from specialist service verification: one cannot replace the other.
Arrange a teacher walkthrough using representative apparatus. Confirm where supplies will be collected, how workstations will be supervised and where cleaned items will return. Record any changes needed before routine teaching starts.
Frequently asked questions
What should a school chemistry laboratory layout drawing include?
Include measured room dimensions, doors, furniture sizes and references, working positions, circulation, storage and service locations. Add a scale, legend, revision number and approval record so the drawing can guide procurement and installation.
Can we use a standard chemistry lab layout template?
A template can organise the brief and suggest arrangements. It must be adapted to the surveyed room, teaching activities, student needs and applicable requirements before becoming an installation drawing.
What are the CBSE chemistry lab design standards?
Start with CBSE’s current infrastructure requirements and Chemistry Laboratory SOP, then check amendments and applicable local requirements. Have the responsible project team confirm the provisions for your school’s stage and proposed laboratory.
Are island benches better than wall-side benches?
The choice depends on room geometry, teaching workflow, supervision and service routes. Compare feasible options with occupied workstations and apparatus shown. Neither arrangement is suitable for every school.
Can existing furniture be reused during a renovation?
Assess its condition, dimensions, surface suitability and compatibility with the new layout. Include any repairs or modifications in the scope and confirm suitability before treating reuse as a saving.
Plan your school chemistry laboratory with Labsolute Innovation
A useful layout consultation begins with your room measurements, photographs, classes served, planned practical activities and existing service information. Include furniture you hope to retain and your intended installation period.
Request a layout consultation with Labsolute Innovation to discuss the furniture arrangement and project scope for your school. Ask for a proposal that connects the layout, specifications and installation responsibilities so your team can review the complete requirement before ordering.